TFB Armorer’s Bench: Colt 1877 Disassembly


Welcome everyone to the TFB Armorer’s Bench! As mentioned in the little blurb below, this series will focus on a lot of home armorer and gunsmith activities. I saw some interest in a Colt 1877 disassembly article. This is fun because it may come off as your average Colt 1873 (peacemaker) but the insides are completely different and this is to its detriment, unfortunately. Double action is great but the design leaves a lot to be desired in terms of simplicity. Would I take one apart if I did not have the experience that I have? No. Are there many resources for taking one apart? No, not much. Besides the interest that is why I am doing this. Hopefully, it will be of some help. Let’s dive right into this Colt 1877 disassembly article!
More Colt 1877 Content:
- TFB Armorer's Bench: Diagnosing and Assessing a Colt 1877 Lightning
- TFB Armorer's Bench: Commentary on The Colt 1877 Revolvers
TFB Armorer’s Bench: Colt 1877 Disassembly
Here, we at TFB hope to inform, entertain, and even inspire any would-be gunsmith or armorer out there. Ideally, with the information I provide and with the help of our sponsors, you can have some useful knowledge about the conservation and improvement of firearms technology while at the same time sharing experiences and teaching each other new tips and tricks along the way in the comments. Digging deep into what it is to be an armorer or gunsmith has significance but what is important is what those people do to show they’ve earned that title. I am happy to share my experiences and knowledge and hope it is informative!
Make your personal safety a priority:
- Practice proper gun safety. Always make sure before the firearm hits your bench that it is unloaded and safe to be handled.
- Wear the proper safety equipment. The main one would be safety glasses (decent ones) since parts are often under spring tension and you may work with high RPM tools. Other honorable mentions would be latex gloves or a respirator when working with potentially harmful solvents and oils. Also hearing protection when working with loud machinery or test-firing firearms.
- Modifications, alterations, and customizations will void your firearm’s warranty 9.5 times out of 10. Please take that into consideration before attempting any at-home gunsmithing.
- If you are unsure about proper safety practices, disassembly procedures, or warranty standards, stop, put down the tools, and consult a competent gunsmith.
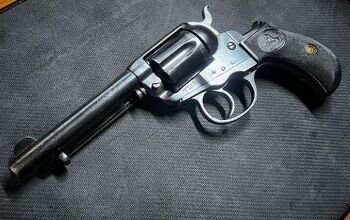
Colt 1877 Disassembly
First thing is first! Practice all the rules of gun safety. When disassembling a firearm, you should always wear safety glasses due to multiple parts being under spring tension. Triple-check that the firearm is unloaded. All set? Let us jump right into it!
I should mention that I had an old book on standby that I knew of and paid way too much for. It’s hard to call it a book and it is out of print but it’s not completely useless. It does offer some information on issues and fixes and so on but nothing earth-shattering and by no means a fix-it book for those in deep with their 1877. It had detailed information on the disassembly which was nice to refer to from time to time to make sure I wasn’t about to break anything. It is called Trouble-Shooting The Colt Lightning by Clifford W. Mills.

First thing with most 1870s Colt derivative revolvers we can start by taking out the cylinder by first placing the gun in half cock.

From here we can push the cylinder pin retainer into the frame and slide the cylinder pin toward the muzzle.

Now we can take off the grip panels. Make sure when reinstalling these not to over-tighten if they are originals. They tend to crack easily with age.

Now that we have a glimpse under the hood we can see things look very similar to a Colt 1873. Same sort of three-piece frame orientation, same-looking spring, etc. But that spring is actually hooked and attached to a hammer strut.

From this angle, we can see the Colt 1877’s unique bolt which stops the cylinder from rotating. On just about every successful design the bolt is usually located at the bottom of the frame-mounted horizontally, hence the cylinder notches you can spy on most revolvers.

These notches are at the back face of the cylinder.

Next up we can start taking the grip frame apart. This is started by removing the screw at the bottom of the saw handle/birds head grip.

After that, we can follow the same course as a normal 1873 disassembly with the two screws just under that hammer.

With the rear grip frame off we can move onto the hammer spring. Loosen this screw and unhook the spring from the hammer strut.

After the hammer spring is removed the trigger guard frame is next. There are three screws that need our attention. The lonely one is shorter than the pair. The pair are allegedly not interchangeable, however, when I tested them during reassembly they were both the same length and thread.

For the sake of being thorough, I made sure to keep track of which was which.

There is a hammer spring tension screw located at the front of the grip on the trigger guard frame. This does not need to be removed. It is used to apply or release pressure on the hammer spring in order to adjust the stiffness or looseness of the trigger/hammer feel.

Here we can look at the complicated mechanism before us. Remember, it is wise to take photos throughout the disassembly of unfamiliar guns or complicated guns. This way if you have to ask yourself the orientation of a part you have a reference.

Leaving the complicated stuff be for a moment we can direct our attention to the ejector rod assembly. This is removed by unscrewing the set screw located at the front toward the muzzle. From there the rod housing can be slid off the front.

If you have trouble working it loose do not do any sort of bending or wiggling motions! It’s a pretty thin tube so we don’t want to kink or bend anything. Simply pull back on the ejector rod and let it fly forward. The light force forward will dislodge the tube eventually.

This assembly consists of the tube, screw, ejector rod, and spring. My spring was broken with age so I replaced it.

For this portion my sources recommend having the gun oriented as such; upside down.

We can start with the sear screw located here. The sear is under some spring tension but not in the way that it will fly across the room.

More than likely it will be held in place and have to be persuaded out with a pick.

Next would be the hammer screw located here.

Removing this screw should allow you to move the hammer rearward. It should be noted that the hammer strut tail is basically built into the hammer and does not need to be removed. You’d have to drill it out if you really had to.

Now that the hammer is removed it reveals that the trigger itself has a tail/strut which intersects with the hammer.

Next up would be the trigger screw located here.

Removing the trigger will reveal a small assembly of parts that include the trigger, the hand, the hand spring, the hand spring screw a roller, roller pin, and trigger strut. Much like the hammer, the trigger strut shouldn't need to be removed.

The hand can be slid to the side in order to remove it. If this feels difficult depress the spring under it to relieve the tension. Make sure not to bend it.

The spring can be removed by taking the screw out but I did not bother to do this for the maintenance I was doing.

The roller is tricky. It should not be done but it's a common issue with these guns so it sometimes needs to be. For more info on that issue, I recommend checking out the commentary article as well as my maintenance article.

The roller carries the same risks as an AR-15 trigger guard. The meat on both sides has no support so extra force could bend or break stuff. If it is necessary the roller can be removed by using a small punch or pliers with a small rod in order to lightly tap the pin out. IT DOES NOT NEED TO COME ALL THE WAY OUT. Just enough to get the roller out and in.

Taking our attention back to the frame we can now remove the sear/bolt spring which looks like a complicated monster in its own right. I would imagine these guns were called the “gunsmith’s nightmare” in part because replacement springs were not a thing. You’d have to make one. Nowadays places like Popperts have some.

If it has not already come out the bolt can now be removed back and out.

This leaves the trigger spring. Note the roller mark left from years of usage and wear. My sources recommend against removing this but do not state why. I see no reason other than the method of reassembly changes slightly once it's out. I will explain when we get there.

It is removed via the visible screw. Below we can see the correct orientation is that when the screw pressure is applied it will bend toward the trigger.

Lastly, we have our loading gate assembly. This is removed by loosening the screw located here.

Under the screw will be a spring and plunger that apply pressure to the gate in the same way a spring and plunger does to an AR pivot/takedown pin.

Note: The tension of the loading gate can be adjusted by tightening or loosening that screw. Don’t go out and buy a screw-like I did if your loading gate flops open while shooting. It probably just needs a turn or two.
The loading gate can be slid off and then that is all she wrote!

Reassembly Tips: Colt 1877 Disassembly
So as with most things, just about everything goes back on in reverse order with a twist here or a depression there.
One such precaution would be the aforementioned trigger spring. We want to install this after the trigger assembly is installed. This is because if it was in there beforehand, replacing the trigger would require downward force while screwing the trigger screw it.
Simply slide the trigger spring in under the trigger and tighten the screw down until it feels right.

The next tip would be replacing the sear/bolt spring. This is done after the bolt is installed but before the sear. While the sear is being installed there is a hooked tail that must rest in a small notch on the sear as shown.

It is possible to install it in front of or on top of the sear which will render the gun without function.
Lastly, when reinstalling the cylinder pin we should be careful. The cylinder pins for the Colt 1877 will have a notch meant to intersect with the retaining plunger. Make sure it is in the right orientation before inserting.
Final Thoughts: Colt 1877 Disassembly
There you have it folks! It's always a pleasure to get to do this and share it and potentially help someone out. As always remember to give things a wipe down with some light oil so the sweat and oils from your hands don’t cause anything to rust inside. If you have any questions please don’t hesitate to reach out and I will see you next time!

As always, thank you for reading TFB! Be safe out there, have fun while shooting, and we will see you next time for the TFB Armorer’s Bench! Also, let us know what you think in the comments below! We always appreciate your feedback.
Writer | TheFirearmBlogWriter | AllOutdoor.comInstagram | sfsgunsmithOld soul, certified gunsmith, published author, avid firearm history learner, and appreciator of old and unique guns.
More by Sam.S


![[SHOT 2024] Bushmaster Firearms Debuts New Carry Handle Rifles](https://cdn-fastly.thefirearmblog.com/media/2024/05/16/14526979/shot-2024-bushmaster-firearms-debuts-new-carry-handle-rifles.jpg?size=350x220)
![[SHOT 2024] North American Arms Sentinel Mixes And Matches Their Formula](https://cdn-fastly.thefirearmblog.com/media/2024/05/16/14528896/shot-2024-north-american-arms-sentinel-mixes-and-matches-their-formula.jpg?size=350x220)
![[SHOT 2024] Turkeys Beware – New Tungsten 28GA Load From Apex ammunition](https://cdn-fastly.thefirearmblog.com/media/2024/05/19/14782813/shot-2024-turkeys-beware-new-tungsten-28ga-load-from-apex-ammunition.jpg?size=350x220)


Comments
Join the conversation
"Would I take one apart if I did not have the experience that I have? No."
I took Sig's 365 armorers class. After that, taking apart and reassembling any other gun is like a Lego Duplo set. This is more involved than my Colts, but it doesn't look that bad. On the other hand, I would have to refer to this page because I'm an idiot and never would have thought to label/tape those screws and draw a diagram.
Great stuff, now I just need to own one of these guns!